离线部署镜像仓库搭建
一、系统准备
- 一台可联网服务器:用于同步仓库(与目标系统同架构)
- 一台离线内网服务器:最终使用离线内网仓库的机器
- 存储空间:至少200GB
- 系统版本:CentOS Linux release 8.5.2111
二、在可联网服务器上同步仓库
1.安装必要工具
# 创建软件包文件,下载必要工具
mkdir /opt/rpm# 只下载包不安装
yum install --downloadonly --downloaddir=/opt/rpm yum-utils createrepo nginx  wget -y# 安装必要工具
yum install yum-utils createrepo -y
2.创建存储目录并同步阿里源
# 创建存储目录
mkdir -p /data/centos/6
mkdir -p /data/openeuler/22.03
mkdir -p /data/kylin/2403# 同步基础源(centos6)
dnf reposync --repofrompath=os,https://mirrors.aliyun.com/centos-vault/6.10/os/x86_64/ --repo=os -p /data/centos/6 -n# 同步更新源(centos6)
dnf reposync --repofrompath=updates,https://mirrors.aliyun.com/centos-vault/6.10/updates/x86_64/ --repo=updates -p /data/centos/6 -n# 同步扩展源(centos6)
dnf reposync --repofrompath=extras,https://mirrors.aliyun.com/centos-vault/6.10/extras/x86_64/ --repo=extras -p /data/centos/6 -n# 同步epel源(centos6)
dnf reposync --repofrompath=epel,https://mirrors.aliyun.com/epel-archive/6/x86_64/ --repo=epel -p /data/centos/6 -n# 同步基础源(openeuler22.03)
dnf reposync --repofrompath=os,https://mirrors.aliyun.com/openeuler/openEuler-22.03-LTS-SP4/OS/x86_64/ --repo=os -p /data/openeuler/22.03 -n# 同步EPOL源(openeuler22.03)
dnf reposync --repofrompath=EPOL,https://mirrors.aliyun.com/openeuler/openEuler-22.03-LTS-SP4/EPOL/main/x86_64/ --repo=EPOL -p /data/openeuler/22.03 -n# 同步everything源(openeuler22.03)
dnf reposync --repofrompath=everything,https://mirrors.aliyun.com/openeuler/openEuler-22.03-LTS-SP4/everything/x86_64/ --repo=everything -p /data/openeuler/22.03 -n# 同步update源(openeuler22.03)
dnf reposync --repofrompath=update,https://mirrors.tuna.tsinghua.edu.cn/openeuler/openEuler-22.03-LTS-SP4/update/x86_64/ --repo=update -p /data/openeuler/22.03 -n#同步基础源(Kylin2403)
dnf reposync --repofrompath=base,https://update.cs2c.com.cn/NS/V10/V10SP3-2403/os/adv/lic/base/x86_64/ --repo=base -p /data/kylin/2403 -n#同步updates源(Kylin2403)
dnf reposync --repofrompath=updates,https://update.cs2c.com.cn/NS/V10/V10SP3-2403/os/adv/lic/updates/x86_64/ --repo=updates -p /data/kylin/2403 -n
3.下载并保存 GPG 公钥
# 下载官方GPG公钥rpm(centos6)
wget https://mirrors.aliyun.com/centos-vault/RPM-GPG-KEY-CentOS-6 -O /data/centos/6/RPM-GPG-KEY-CentOS-6# 赋予合适权限
chmod 644 /data/centos/6/RPM-GPG-KEY-CentOS-6# 下载官方GPG公钥EPEL(centos6)
wget https://mirrors.aliyun.com/epel/RPM-GPG-KEY-EPEL-6 -O /data/centos/6/RPM-GPG-KEY-EPEL-6# 赋予合适权限
chmod 644 /data/centos/6/RPM-GPG-KEY-EPEL-6# 下载官方GPG公钥rpm(openeuler22.03)
wget https://mirrors.aliyun.com/openeuler/openEuler-22.03-LTS-SP4/OS/x86_64/RPM-GPG-KEY-openEuler -O /data/openeuler/22.03/RPM-GPG-KEY-openEuler# 赋予合适权限
chmod 644 /data/openeuler/22.03/RPM-GPG-KEY-openEuler
4.打包并传输到离线服务器
# 打包源文件
tar -zcvf centos.tar.gz -C /data centos
tar -zcvf kylin.tar.gz -C /data kylin
tar -zcvf openeuler.tar.gz -C /data openeuler
tar -zcvf rpm.tar.gz -C /opt rpm# 通过存储介质传输或者到离线服务器
# 内部网络:如果有隔离的网络通道,使用scp/rsync,传输至指定文件夹
scp data.tar.gz root@10.160.5.145:/data
scp kylin.tar.gz root@10.160.5.145:/data
scp openeuler.tar.gz root@10.160.5.145:/data
scp rpm.tar.gz root@10.160.5.145:/data
三、在内网服务器上创建仓库
1.安装必要工具
按顺序安装rpm包
rpm -ivh /opt/rpm/drpm-0.4.1-3.el8.x86_64.rpm
rpm -ivh /opt/rpm/libmetalink-0.1.3-7.el8.x86_64.rpm
rpm -ivh /opt/rpm/createrepo*.rpm
rpm -ivh /opt/rpm/nginx*.rpm
rpm -ivh /opt/rpm/wget-1.19.5-10.el8.x86_64.rpm
rpm -ivh /opt/rpm/yum-utils-4.0.21-3.el8.noarch.rpm
2.创建元数据
# 生成centos6仓库数据
createrepo /data/centos/6/epel
createrepo /data/centos/6/os
createrepo /data/centos/6/updates
createrepo /data/centos/6/extras# 生成kylin仓库数据
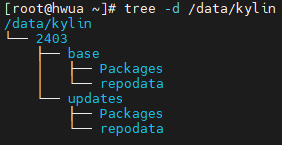
createrepo /data/kylin/2403/base
createrepo /data/kylin/2403/updates# 生成kylin仓库数据
createrepo /data/openeuler/22.03/EPOL
createrepo /data/openeuler/22.03/os
createrepo /data/openeuler/22.03/update
createrepo /data/openeuler/22.03/everything

3.Nginx 服务配置
- 在
/etc/nginx/conf.d/目录下创建一个新的配置文件yum-repo.conf
# 创建专门用于YUM源的配置文件
cat > /etc/nginx/conf.d/yum-repo.conf << 'EOF'
server {listen       80;server_name  _;  # 匹配所有域名# 设置根目录为你的YUM源路径root /data;# 开启目录列表autoindex on;autoindex_exact_size off;autoindex_localtime on;charset utf-8;# 主位置块location / {# 不显示默认的index.html,直接显示目录列表# 可以注释掉index指令# index index.html;}# 确保正确显示中文charset_types text/html text/plain text/xml text/css application/javascript;# 错误页面配置error_page 404 /404.html;error_page 500 502 503 504 /50x.html;location = /50x.html {root /usr/share/nginx/html;}
}
EOF
- Nginx主配置文件配置
# 注释掉38-57行
[root@hwua ~]# cat /etc/nginx/nginx.conf
# For more information on configuration, see:
#   * Official English Documentation: http://nginx.org/en/docs/
#   * Official Russian Documentation: http://nginx.org/ru/docs/user nginx;
worker_processes auto;
error_log /var/log/nginx/error.log;
pid /run/nginx.pid;# Load dynamic modules. See /usr/share/doc/nginx/README.dynamic.
include /usr/share/nginx/modules/*.conf;events {worker_connections 1024;
}http {log_format  main  '$remote_addr - $remote_user [$time_local] "$request" ''$status $body_bytes_sent "$http_referer" ''"$http_user_agent" "$http_x_forwarded_for"';access_log  /var/log/nginx/access.log  main;sendfile            on;tcp_nopush          on;tcp_nodelay         on;keepalive_timeout   65;types_hash_max_size 2048;include             /etc/nginx/mime.types;default_type        application/octet-stream;# Load modular configuration files from the /etc/nginx/conf.d directory.# See http://nginx.org/en/docs/ngx_core_module.html#include# for more information.include /etc/nginx/conf.d/*.conf;#    server {
#        listen       80 default_server;
#        listen       [::]:80 default_server;
#        server_name  _;
#        root         /usr/share/nginx/html;
#
#        # Load configuration files for the default server block.
#        include /etc/nginx/default.d/*.conf;
#
#        location / {
#        }
#
#        error_page 404 /404.html;
#            location = /40x.html {
#        }
#
#        error_page 500 502 503 504 /50x.html;
#            location = /50x.html {
#        }
#    }# Settings for a TLS enabled server.
#
#    server {
#        listen       443 ssl http2 default_server;
#        listen       [::]:443 ssl http2 default_server;
#        server_name  _;
#        root         /usr/share/nginx/html;
#
#        ssl_certificate "/etc/pki/nginx/server.crt";
#        ssl_certificate_key "/etc/pki/nginx/private/server.key";
#        ssl_session_cache shared:SSL:1m;
#        ssl_session_timeout  10m;
#        ssl_ciphers PROFILE=SYSTEM;
#        ssl_prefer_server_ciphers on;
#
#        # Load configuration files for the default server block.
#        include /etc/nginx/default.d/*.conf;
#
#        location / {
#        }
#
#        error_page 404 /404.html;
#            location = /40x.html {
#        }
#
#        error_page 500 502 503 504 /50x.html;
#            location = /50x.html {
#        }
#    }}
4.检查并重启Nginx
# 检查配置文件语法
nginx -t# 重新加载配置(如果语法检查通过)
systemctl reload nginx# 或者重启Nginx
systemctl restart nginx

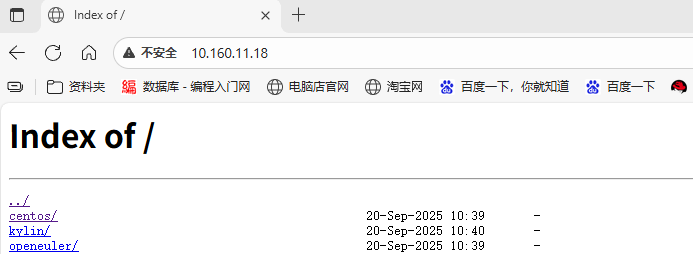
5.检查网页数据
四、客户端测试
1.centos 测试
# 检查系统环境
[root@localhost ~]# cat /etc/centos-release
CentOS release 6.2 (Final)# 移除系统自带仓库
[root@localhost ~]# mkdir /etc/yum.repos.d/centos
[root@localhost ~]# cd /etc/yum.repos.d/
[root@localhost yum.repos.d]# mv ./*.repo centos# 配置镜像仓库
cat > centos.repo << EOF
[os]
name=os
baseurl=http://10.160.11.18/centos/6/os/
gpgcheck=1
enabled=1
gpgkey=http://10.160.11.18/centos/6/RPM-GPG-KEY-CentOS-6[epel]
name=epel
baseurl=http://10.160.11.18/centos/6/epel/
gpgcheck=1
enabled=1
gpgkey=http://10.160.11.18/centos/6/RPM-GPG-KEY-EPEL-6[updates]
name=updates
baseurl=http://10.160.11.18/centos/6/updates/
gpgcheck=1
enabled=1
gpgkey=http://10.160.11.18/centos/6/RPM-GPG-KEY-CentOS-6[extras]
name=extras
baseurl=http://10.160.11.18/centos/6/extras/
gpgcheck=1
enabled=1
gpgkey=http://10.160.11.18/centos/6/RPM-GPG-KEY-CentOS-6
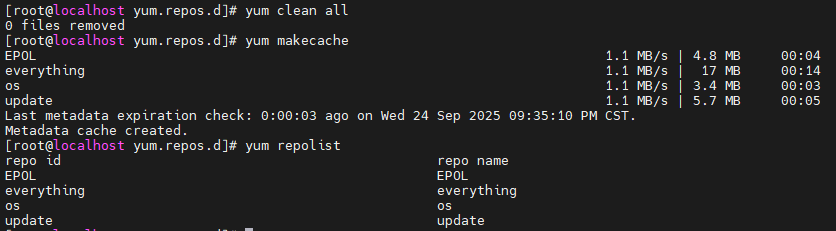
EOF# 清除YUM缓存
yum clean all
yum makecache# 验证配置
yum repolist
yum install -y nginx # 测试安装一个包,验证GPG校验是否正常#如果在安装过程中出现 GPG 验证错误,可检查公钥路径是否正确或重新导入公钥:
rpm --import http://10.160.11.18/centos/6/RPM-GPG-KEY-CentOS-6
rpm --import http://10.160.11.18/centos/6/RPM-GPG-KEY-EPEL-6
2.麒麟系统kylin测试
# 检查系统环境
[root@localhost ~]# cat /etc/kylin-release
Kylin Linux Advanced Server release V10 (Halberd)# 移除系统自带仓库
[root@localhost ~]# mkdir /etc/yum.repos.d/kylin
[root@localhost ~]# cd /etc/yum.repos.d/
[root@localhost yum.repos.d]# mv ./*.repo kylin# 配置镜像仓库
cat > kylin.repo << EOF
[base]
name = base
baseurl = http://10.160.11.18/kylin/2403/base/
gpgcheck = 1
gpgkey=file:///etc/pki/rpm-gpg/RPM-GPG-KEY-kylin
enabled = 1[updates]
name = updates
baseurl = http://10.160.11.18/kylin/2403/updates/
gpgcheck = 1
gpgkey=file:///etc/pki/rpm-gpg/RPM-GPG-KEY-kylin
enabled = 1
EOF# 清除YUM缓存
yum clean all
yum makecache# 验证配置
yum repolist
yum install -y nginx # 测试安装一个包,验证GPG校验是否正常
3.欧拉系统测试
# 检查系统环境
[root@localhost ~]# cat /etc/openEuler-release
openEuler release 22.03 (LTS-SP4)# 移除系统自带仓库
[root@localhost ~]# mkdir /etc/yum.repos.d/openEuler
[root@localhost ~]# cd /etc/yum.repos.d/
[root@localhost yum.repos.d]# mv ./*.repo openEuler# 配置镜像仓库
cat > openEuler.repo << EOF
[EPOL]
name=EPOL
baseurl=http://10.160.11.18/openeuler/22.03/EPOL/
enabled=1
gpgcheck=1
gpgkey=http://10.160.11.18/openeuler/22.03/RPM-GPG-KEY-openEuler[everything]
name=everything
baseurl=http://10.160.11.18/openeuler/22.03/everything/
enabled=1
gpgcheck=1
gpgkey=http://10.160.11.18/openeuler/22.03/RPM-GPG-KEY-openEuler[os]
name=os
baseurl=http://10.160.11.18/openeuler/22.03/os/
enabled=1
gpgcheck=1
gpgkey=http://10.160.11.18/openeuler/22.03/RPM-GPG-KEY-openEuler[update]
name=update
baseurl=http://10.160.11.18/openeuler/22.03/update/
enabled=1
gpgcheck=1
gpgkey=http://10.160.11.18/openeuler/22.03/RPM-GPG-KEY-openEuler
EOF# 清除YUM缓存
yum clean all
yum makecache# 验证配置
yum repolist
yum install -y nginx # 测试安装一个包,验证GPG校验是否正常